Roland SPD-SX Housekeeping

SPD.jpg

Since the Jan 2018 blog post ’Running Tracks On An SPD-SX’ a lot of people have reached out with further questions about a number of things. So this is part 2… where I go over a few of the most common questions I’m asked, and also some stuff I’ve learnt in the past year or two.

Accidentally stopping track playback, while playing triggers

poly-mono.jpg

This is something that bugged me for a long time until I figured it out. For every sound you assign to a pad, you have the option of playing back that sound monophonicly or polyphonicly.

Mono voicing means that if you play the same sample more than once, the SPD will cut off the first instance of the sample in order to play the second. Poly voicing means that when you play a sample more than once, the SPD will allocate a second tone generator for the second hit of the sample.

The SPD has 20 of these tone generators for poly voicing, and once you’ve reached 20 instances, the SPD will cut off the ‘oldest’ sample you triggered, and will keep doing so for every new sample that’s triggered in order to free up tone generators to allow sample to continue firing. A tone generator is allocated when the sample is triggered, and lasts as long as the sample lasts. If the sample is 10 seconds, you will be using 1/20 tone generators for 10 seconds. If you’re running a backing track, the BT will almost always be the oldest thing you’ve triggered (assuming the BT and click begin at the start of the track). You can only play up to 20 poly samples at the same time before the SPD begins to cut off the oldest instance of a poly sample being triggered, and so it is imperative that you run as many samples as possible in MONO voicing to avoid using up all of the tone generators with 20 POLY samples playing at the same time.

If you’re firing off one shot samples, ensure they’re MONO to avoid your backing track cutting out in the middle of your Devon Taylor HiHat buzz rolls. Keep the tracks POLY and any longer samples POLY too. It’s unlikely you’ll use all 20 tone generators and stop the track, but if you do, this will be why.

Sub Out Signal bleed into phones mix

This issue is occurs when playing a backing track with a padlinked click track. Any sounds set to outut from MAIN or SUB out bleed into the PHONES out, meaning there’s track and triggers as well as the click wav.

closeup.jpg

When you navigate to your outputting options on the SPDSX. and select SUB output for a backing track wav, this for some reason actually translates to SUB OUT and PHONES. It’s not the end of the world, you just have to make sure when you are bouncing your backing tracks, you bounce your click track as JUST click, and crank the gain a bit before bouncing so you can lower the FOH track volume later. If you bounce click with a little bit of track for monitoring purposes, you will in effect have double backing track in your ears which very easily drowns out the click!!

This issue is something that A LOT of people have asked about. Unfortunately as far as I know there is no fix for this. Hopefully this is something Roland can sort in future iterations of the SPD.

QUICK FIRE

Mute Groups

Mute groups function as the name suggests. When you assign two pads to a mute group, hitting one will mute the other (and vice versa). When running BTs, ensure you haven’t set any mute groups: you can see how this could be problematic while firing samples on top of a track.

Panning samples

Panning samples is something that works for some gigs and not for others, so be warned!

On shows that you know are capable of running all your outputs stereo, it’s good form to separate your high frequency samples, and your low frequency samples. Panning (say) Kicks, Subs and other low end samples hard L, and claps, perc, snaps, hats and all your other tops hard R makes the sound engineer’s job a lot easier when it comes to mixing your electronics. By doing this you’re passing on a lot more control to FOH, giving them the ability to run your low EQ samples through a sub and your high EQ samples through tops, avoiding muddying up the mix. It’s better for everyone!

Do keep in mind though that if you’re on a gig where the engineer only has space for a mono line for samples, you will need to either have a duplicate kit with the samples centred, or you will need to pan everything back to centre for that gig, save the risk of hearing half the parts!!


SPD-SX internal click Vs click from a daw

I recently got an email endorsing the practicalities of using the SPD-SX’s internal click as opposed to bouncing your own as I suggest to do in my other blog post Running Tracks On An SPD-SX.

The advantages of using the SPD’s internal click are as follows:

Clear and sonicly pleasing click tones that cut through effectively

Easier to programme onboard, time sensetive effects on the fly (Delays etc)

Dedicated hardware volume control on UI


The advantages of using a seperate, bounced down click are as follows:

Ability to change tempos within songs

Ability to bounce vocal cues, guide tones and performance instructions onto the click track

Choice of metronome tone (use anything you want!)

Faultless synchronisation between track and click using Padlink

Ultimately for me, I will always choose to bounce a separate click file. IMO the advantages of using a click made in a DAW far outweigh the advantages of using the internal click. While it would be ideal to have a dedicated physical volume control specifically for the click (or even a user-asssignable control…Roland….please…), when put beside the ability to include vocal cues, and to flex tempos within one song, there’s a clear winner for me.

——————

I wrote this up in March 2019 but delayed posting to wait for a response from Roland about the signal bleed from subout to phones out. Never received an answer to this so I’m posting now at the end of 2020…. better late than never!

Dual SPD-SXs !

2spd.jpg

Recently I got the chance to use two SPDs to run track and triggers independently, for a show where I usually use one. In my opinion running tracks while playing triggers all from one SPDSX is completely sufficient, and very reliable if set up right. However, this time I chose to split track and trigger operations not only to separate pages, but to separate systems. A bit about reliability, but mostly me geeking out.

This led me to explore linking two SPDSXs together via MIDI. In the past I have played a setup that was transmitting programme changes to a MOTU interface via MIDI out from the SPD, but in that instance it was to control an Ableton playback rig, and not another SPDSX. This is really niche… most people will not need to run something like this… but it’s cool so I’ll explain the process - it’s actually pretty simple to setup.

Obviously you’re going to need MIDI cables. In my config I had the two SPDs mounted one above another. The top unit was for triggers, and the bottom unit for track playback. I wanted to be able to control page movement with either unit, so I used MIDI OUT on SPD A to MIDI IN on SPD B and vice versa, meaning both units transmitted and received MIDI programme changes.

MIDI.jpg

If synchronising page control between two SPDs is something you’re looking to do, then you need to make sure your track page order matches up perfectly with your trigger page order, and also that both page orders land on the same page numbers.

For the show I was using this setup on, I had 18 pages in total. My pages ran from something like 50 to 68… I can’t remember exactly what. Once configured, hitting page up or down on either SPD moved both SPDs to the same page. For example, if SPD A is on page 10 and SPD B is on page 93, and I hit ‘Page Up’ ( + ) on SPD A, both SPD A and B will jump to page 11. Once they’re synced, both pages on both units will move in tandem based on the page number. . This is why it’s important that page numbers and orders are mirrored on both systems.

pctx.jpg

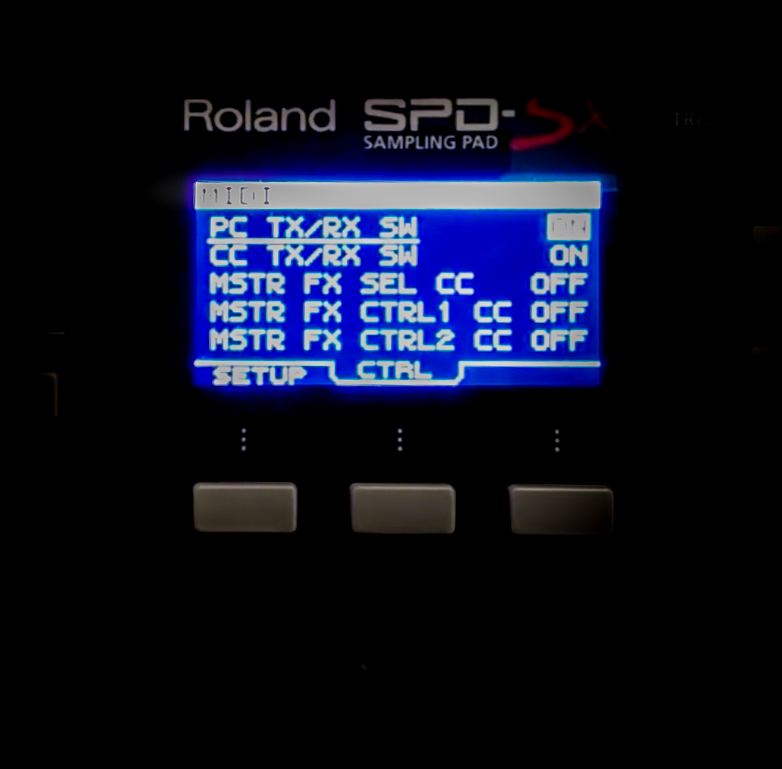
setup > midi > setup > PC on

To configure the SPDs, first ensure both units are operating on the same MIDI channel (GLOBAL CH). The factory set channel is 10. Next you’re going to want to navigate to: setup > MIDI. You’ll be met with two tabs: Setup and Control. Select Setup, and you’ll see ‘PC TX/RX SW’. This is where you can toggle on and off the option to transmit and receive MIDI programme / page changes (PC). This needs to be ON for both SPDs.

Running two SPDs together like this meant I had double the outputs I would usually have, with full use of Master Out and SUB Out for both systems. For the ‘triggers SPD’ I used Master Out, with tops samples and bass samples split (as I mention in my SPD Housekeeping blog post. You can find that here).

Screenshot+2019-03-23+at+13.29.06.jpg

My triggers setup for this gig (incase you’re wondering) saw all of the SPD’s trigger inputs populated. I used 2 Y split cables in ‘TRIG IN 1/2 and 3/4’. Y splitter cables function by using the metal tip of the jack termination to carry one signal, and a metal ring just behind the tip to carry a second signal. These two signals split off from one cable into two.

ring%26tip2.jpg

What this means is I can run 4 individual triggers from only two trigger inputs. On this gig, for electronics, I used all Roland hardware - I ran an ‘RT-30H Single’ trigger on my snare, an ‘RT-30K’ trigger on my kick drum, a ‘KD7’ next to my kick drum (soon to be a KT-10) and a ‘BT-1’ above my rack toms. 4 triggers is just right for this gig.

On most songs I’m layering acoustic drum parts with the sounds on the record. Stacking claps / electric snare samples on snares and sub kicks / 808s / electronic kick samples on acoustic kicks really allows the song to come to life without affecting the overall sonic of the record when re-arranged for live performance. The KD7 next to the acoustic kick is great for moments where i’m playing purely electric drum parts and no acoustic sounds are required.

Image by austinpaz.com, October 2017

Image by austinpaz.com, October 2017

Frequently, I will match the sample on the KD7 with the sample on the RT-30K so the sound doesn’t change between the acoustic kick drum and the electric one. The BT-1 sits just above the 10” rack tom and I use it mostly for backbeat replacement stuff. I LOVE the BT-1s: IMO one of Roland’s best trigger products to date. They’re low profile, and very ideally shaped meaning you can tuck them almost anywhere around the kit without having to compromise on the setup. I have two of these and regularly use them both. 4 triggers is great, but I’d love to experiment with using a TD-50 in conjunction with the SPD for expanded trigger functionality. It would be great to be able to use two RT-30H triggers on a main snare and side snare respectively, an RT-30K on the kick, a KD7 next to the kick, and two or more BT-1s around the kit. I’d also love to explore using triggers to control noise gates for drum mics…

In my first blogpost about Running Tracks On An SPD-SX, I talk about assigning the click track and FOH track to two pads and then linking them using ‘padlink’. With the SPD configuration I used, there was no space to hit pads to fire off the BTs as my triggers SPD was sat right above the track SPD. So instead, I assigned the BT and Click wavs to the Boss FS - 5U footswitch. I then ‘padlinked’ these ‘pads’ just as I would do normally, but this time with footswitch 1 (FS1) and footswitch 2 (FS2).

Screenshot 2019-03-21 at 09.37.43.png

Using a single switch as opposed to the Boss FS-6 duel switch doesn’t matter in this config as the pads are linked so both tracks will always fire off when you step on the switch, regardless of the fact you’ve assigned a track to ‘FS2’ which technically doesn’t exist in this instance. As long as the track is mapped to a pad option, and the pads are linked and you can trigger at least one of them (by hitting a pad / ext trigger / footswitch), then you’re good to go. For example you could assign a click track to pad 1, and the BT to an external trigger (one not plugged in), and as long as they were padlinked and configured to output properly, everything would work as usual when you hit pad 1.

Screenshot 2019-03-21 at 09.37.19.png

Triggering the click and track from a footswitch reduces the margin of error when working close to the SPD during playback. I think it’s good practice to distance the process of starting and stopping the track as far from the process of firing off triggers, as is possible. In my previous blog, I talk about moving track and trigger operations to different pages on one SPD in order to avoid accidentally striking the pad with the track assigned to it while playing trigger parts. In the dual-SPD setup, I’m not only moving operations to separate systems, but moving the playback start / stop control physically away from the unit itself.

There is now no way I can start or stop the track by accidentally hitting an assigned pad, as everything is mapped to the footswitch. The only way a track can be started or stopped is if I stamp on the footswitch, and as long as it’s placed away from where my foot naturally lands next to the HiHat pedal, there’s very little chance of this happening. [Oh, and the ‘ALL SOUNDS OFF’ button, but just don’t press that!!]. Use a bit of fluoro tape on top of the footswitch to make it more visible when the lights go down, and there shouldn’t be any mistakes.

This setup ended up working great. There were no problems and everything ran smoothly. It’s maybe important to note here that the purpose of running MIDI between both systems in this instance was to match the ‘page up’ and ‘page down’ commands and nothing else. There is MUCH more functionality that can be had with MIDI and the SPD, something I plan to explore more and talk about in the near future.

You can check out the dual SPDSX setup from the show in the video below:

If you’ve read this far, thanks for sticking with it. I need to work on making these shorter….

As always if you’ve got any questions, please send me a message and I’d be happy to try and help!


Running Tracks On An SPD-SX [+ triggering]

backing tracks 1.jpg

Over the past month or two I've had a number of people approach me, asking how to go about using the Roland SPD-SX for playback (reliably) while still retaining the 'trigger pad' functionality for firing off one shots and samples. 

Last year, I worked with an electronic - pop artist who's live show required Backing Tracks (BTs) as well as some electronic drum parts played live. The budget did not allow for a separate playback rig, plus in the interest of portability, it made sense to do both of these things from the SPD-SX.  No point in taking a 3u rack to every gig to sit beside me when everything can be done in one. 

Playing tracks through an SPD-SX is a great and extremely viable option for small shows / gigs, where budget, transportation options and space on stage are lacking. In addition, this method allows a stereo mix for BTs as opposed to panning click hard left and track hard right as is common in your most basic 'laptop backing tracks' scenario. 

Making / Bouncing Tracks

Let's say you've got hold of all the stems from the producer / artist / whoever, and in the best possible scenario, all stems have been mixed to 0. Great! After figuring out exactly what you want / need in your tracks, and setting the levels as you wish, it's time to add a click. I work mostly in Logic but this process is the same through any DAW (obviously).

The logic click is pretty useless IMO... fine for bedroom recording but in a live setting where you need to be locked in consistently, it just doesn't cut through, particularly if you've got a lot happening in the BT and/or a loud audience. No go. Instead, I use Logic's Gritty Funk Drum Machine. Ab4 & A4 (I think!) are two cowbell sounds pitched slightly apart, which makes for a great click. Print 1 bar of quarter notes as Ab4, A4, A4, A4, quantize, stretch the length of the BT and you've got your click!

I usually adjust it slightly by adding a Logic compressor, noise gate, and rolling some bottom end off with Channel EQ. I add about 5dB to the compressor output. The Gritty Funk Kit has a slight delay baked in which isn't that audible at lower volumes but definitely noticeable through in ears when used as a stand alone click. I adjust the noise gate as seen below: 

Now it's time to bounce our tracks. First you'll want to mute the click channel and any cue channels you have. Everything that's unmuted will become your FOH mix (ie, your stems). Also important at this point to make sure that the playhead at the end of the track is dragged right up to where your stems and click end, so the BT ends when the track ends. Beware of reverb tails while doing this, I usually leave 4 - 12 bars after whatever is printed 'ends'.

moving end of track.gif

Hit cmd B and you'll get some options for bouncing. Here's what you'll need to choose for playback with an SPD-SX. "The SPD-SX can import .WAV or AIFF files that are 16-bit with a sample rate of 44.1kHz" ONLY. You will not be able to import your tracks on the trigger pad if this isn't right.  

Label this bounce as FOH *songname*. Go back to the project and mute all channels except the click and cues. This will be your in ear click mix. It's v important at this point not to change anything regarding the duration of the song. cmb B again and bounce this track as CLICK *songname*. Now you have a folder with both your FOH mix, and your CLICK mix in. 

BTs and Triggers Simultaneously 

The key to running backing tracks and playing triggers live on the SPD reliably, is to separate both operations onto different pages. This way, there's not a chance of stopping the tracks halfway through by accidentally hitting the BT pads during your performance. With the artist I was playing with, we had a 5 song set. The order of my SPD-SX pages went as follows, where > represents the onward page. 

#Track1 > Track1 > #Track2 > Track2 > #Track3 > Track3 > #Track4 > Track4 > #Track5 > Track5. 

The # represents the page with the BT on, and the page without the # is the page I programmed my sounds and samples onto. Every song has two pages which are always 'track > sounds'. 

Programming the SPD-SX

I would HIGHLY recommend getting the 3rd party 'SPD-SX Editor'. You can find it at www.spd-sx-editor.com. It's about 25 USD but WELL worth the money in the time it will save you. The original Wave Manager from Roland is very limited in it's capabilities in comparison. The rest of this post will be focussed on the 3rd party editor, although everything is possible by physically navigating through settings on the unit itself (not possible with the wave editor).

Once creating and naming pages, you'll want to start dragging & dropping your tracks. The order of the pads on the SPD_SX goes Left to right, top to bottom. EG Pad 1 top left, Pad 4 middle left, Pad 7 bottom left. Here's what the editor looks like. When the SPD is connected, you get your page list on the far right space and the sound index on the space to the left of that.

Screen Shot 2018-01-19 at 01.56.17.png

Backing Track & Click Pages

  • Drop the Click wav on Pad 1, and the FOH wav on Pad 2. Keeping it the same every time makes it easier to diagnose issues when they arise. You'll want to link Pad 1 - Pad 2 (with padlink) so they trigger at the same time.

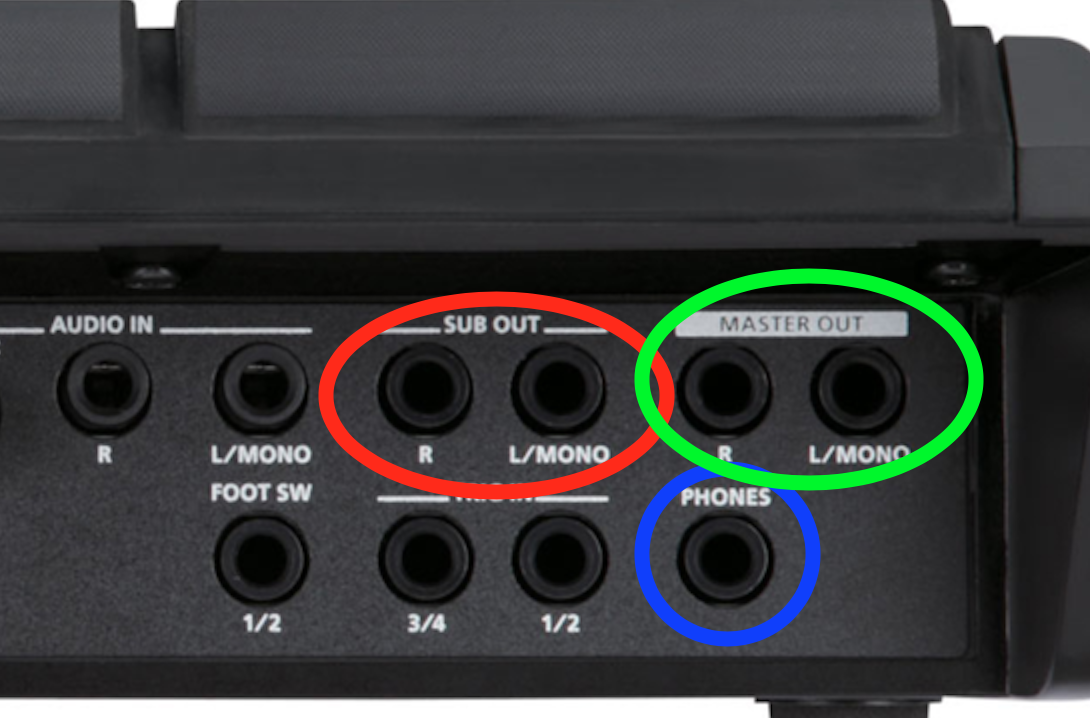
  • For Pad 1 (click), assign the output to PHONES ONLY. For Pad 2 (FOH), assign the output to SUBOUT. The subout output bypasses all fx you apply (using the fx knobs on the front of the unit), and also bypasses the system volume control. This is perfect for tracks as you can still apply fx to your triggers and one shots on the next page, without affecting the backing track.

  • Mono / Poly mode is up to the way you play and what sonic you're after. I'd recommend doing some further reading into these functions to work out exactly whats best for you.

  • Ensure dynamics are OFF. You'll want your BTs to trigger at the same volume every time regardless of how hard you hit the pad.

  • For your trigger pad type, I usually use alt / phrase. If I hit the pad twice, the track will start and stop. The shot / single option means every time you hit the pad, you'll trigger the pad again and again, and will need to hit the mute all button to stop everything. Doesn't really matter which you choose but alt works best for me.

  • Make sure looping is off, and hit save. Done! nearly..

Trigger Page

  • Assign the output for all pads to MASTER OUT.

  • Dynamics on/off depending on what you want. I'd recommend keeping them off so your electronics levels remain the same regardless of how hard you're hitting the pads.

  • Once you've finished and saved, unplug the unit from your computer and you'll want to physically navigate to the same page on the SPDSX. For each pad, you'll want to go to 'pad' settings, hit the 'quick' button, and scroll down to 'Wave Normalise'. Select this and overwrite the wav on the pad. Do this for every one of your pads. Once you've finished, you can adjust the volume levels of individual pads based on what you need.

If you want to go one step further in the interest of reliability / functionality, you can always load the BTs and Clicks onto an external trigger (can be done via SPDSX editor), and fire them from a trigger completely separate from the SPDSX unit, or from a foot switch like the BOSS FS-5U or BOSS FS-6. 

Checking, Double Checking, Triple Checking, etc

After I've loaded all my tracks and sounds, I power off the unit with the power button to save changes. I have a small speaker system with 4 inputs purely for testing programming, and would recommend you find something similar to use. This could be a small 4in desk and a speaker or at a push, an audio interface and DAW. 

I power on the unit and go first to my # pages which have my BTs on. Hit either Pad 1 or Pad 2 (doesn't matter which because we PadLinked them earlier). Do a line check for your SUB OUTs, and plug in some headphones to test the PHONES output. Double check all the settings you applied in the Editor are translated in the unit. 

Next, go to your trigger pages and do the same, but testing the MAIN OUTs. 

Outputting in this way means that the BT volume can be controlled separately from the volume of the sounds despite all lines coming from one unit. 

If you need to route the click to multiple people then you can always take the line out from PHONES into a headphone amplifier, and then onwards from there (hardwired or wireless packs). Similarly, if you want something else in your mix along with the click, then you can always take the PHONES line straight into a smaller personal desk beside you, where you can adjust your own mix with say a return from the main desk.

Red for Stereo BT Outputs. Green for Trigger outputs, blue for Click output.

Red for Stereo BT Outputs. Green for Trigger outputs, blue for Click output.

Here are some positives and negatives to using this method of playing backing tracks;

Positives

  • Relatively quick (once you get the hang of it) to programme.

  • Portable.

  • Multi-uses. Tracks & Triggers!

  • Stereo Output for BTs instead of panning hard R / hard L.

Negatives

  • Only 4 outputs, reduced to 2 if you want to use the triggers on a separate output.

  • More expensive (RRP £500) than dedicated playback machines like the Cymatic LP - 16 (RRP £250).

  • Limited Memory

  • Can't adjust the mix easily once loaded into the unit. (have to re-bounce with DAW)

Once you're done, check, double check, triple check, and then check again. It is NOT a vibe to be delving into the editor 20 minutes before show time to try and fix something you've overlooked. This attention to detail means a lot more peace of mind when you get onto the gig. 

Thanks for reading (assuming you've reached the end of this massive post) and I hope this helps you in your live show endeavours. Shoot me a message on Facebook or instagram (@joemutton) if you've got any questions.